

Happy Saturday Everyone! Let’s try a mommy craft today!!!
My name is Rebecca and I’m addicted to earrings. OK there, I said it. Seriously, I really do need a program or something. I even started my own jewelry business to support my need to accessorize. I can’t help but think that adding color-coordinated earrings to your outfit is the easiest and most inexpensive way to jazz up you wardrobe. I have even pulled some of my friends in with me. We had a great time one evening making our own earrings. It really doesn’t take much time. Even if you don’t think you are crafty, you will be able to do it following these simple directions. All the supplies can be found easily at any craft or do-it-yourself store.
Here is your shopping list:
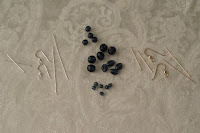 Supplies: 2 Head pins (They are usually sold in a pack of 10 or so) You will need them to be at least one inch long but in some stores you may be able to find them in longer measurements.
 2 Ear wires (They too are usually in a pack of 10 or so)
Beads (vary the colors and sizes for interest). 4mm, 6mm or 8mm are good sizes to get started.
 Tools:
Round nose pliers (both the tips of these pliers are round and cone shaped)
Flat nose pliers (these are smooth so they don’t leave a mark on your metal)
Wire cutters
(You can most likely find all of these pliers in an economy tool kit at the craft store. They are also sold individually)
Before you go shopping, I have a few helpful hints for you. You will be better off, if you make sure the metal component or findings that you purchase are sterling silver or gold filled. Avoid buying metal that is not of a higher quality. When you are selecting your beads, go for glass, synthetic gems/stones or natural shells. I avoid plastic beads because most of them just look cheap. Swarovski crystals are at the top of the list for quality with Czech fire-polished beads at a close second in quality with a better price. Beyond that, you will need to be careful that you don’t get a pressed glass, which can sometimes have a seam around the edge, or some cheaper beads that may have inconsistencies in their coloring. This is from the method that is used in the production of the bead. Some are just sprayed or painted with color and that can actually rub off with frequent use. Better quality beads are made from colored glass or coloring that has been fired onto the surface of the glass.
Once you have everything lined up and the kids down for a nap, you are ready to go.
First you need to decide what sizes and colors you are using, and get them in the order that you like best. I usually put the larger one on the bottom and then gradually get smaller as I add to the design. Or you may want to start small, get big, then go small again. This works best if you keep it symmetrical.  You can slide your beads off and on the head pin until you have found a pattern that you enjoy. You should be sure to leave at least a ¼ of an inch at the top on the pin. While you are holding the beads on as tight as you can, bend the top of the head pin down forming a right angle.
  If you have more than a ¼ inch you can trim that off using the wire cutters. To be sure you are safe; hold the earring and cutters partially in the wastebasket and turn your head away while you cut. Those end pieces can fly when they get snipped off.
 and roll it and the pliers up and away from you, stopping half way.
  Reposition the pliers and continue to roll the pin around the nose of the pliers until you have formed a loop at the top on your bead design.
 Find your ear wire and using the flat nose pliers, open the loop at the bottom by bending or twisting i
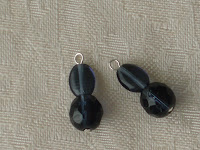
 t to the side. Thread your beaded pin onto this open ring and use the pliers to bend the ear wire closed again. Ta Da! You have one earring. Now do it all again and you’ll have yourself a custom pair of handmade earrings. Here are some of the ones I have on my web site.

![]()
Thanks Rebecca for sharing the love of your craft with us! If you try this at home, leave a comment and let us know how it went! If you have purchased from Rebecca in the past, leave us a comment about how you liked your item!!! I am sure she would be thrilled to hear from you!
